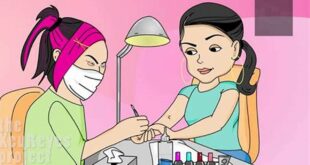
Do it yourself nail art seems like a daunting task. However, it is easier than you might think to create beautiful and unique nail art designs at home. With a little practice, you can master the basics of nail art and create your own stunning designs.
Editor’s Note: This guide to DIY nail art for beginners was published on [date] to provide you with the information you need to get started with nail art.
We’ve analyzed the latest trends and techniques in nail art, and we’ve put together this comprehensive guide to help you create your own beautiful nail designs. Whether you’re a complete beginner or you’ve been doing nail art for years, we have something for you in this guide.
Key Differences:
| Feature | DIY Nail Art | Salon Nail Art ||—|—|—|| Cost | Less expensive | More expensive || Time | More time-consuming | Less time-consuming || Flexibility | More flexible with designs | Less flexible with designs || Satisfaction | More satisfying | Less satisfying |
Transition to main article topics:
In this guide, we’ll cover everything you need to know about DIY nail art, including:
- The essential tools and supplies you need
- Step-by-step instructions for creating basic nail art designs
- Tips and tricks for troubleshooting common nail art problems
- Inspiration for creating your own unique nail art designs
Do it Yourself Nail Art for Beginners
DIY nail art is a great way to save money and have fun. With a little practice, you can create beautiful and unique nail designs at home. Here are 8 key aspects to consider when getting started with DIY nail art:
- Tools: You will need a few essential tools to get started with DIY nail art, such as nail polish, nail art brushes, and dotting tools.
- Supplies: In addition to tools, you will also need some supplies, such as nail polish remover, cotton balls, and toothpicks.
- Techniques: There are many different nail art techniques that you can learn, such as stamping, water marbling, and freehand painting.
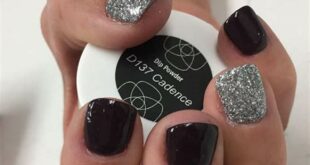
- Designs: There are endless possibilities when it comes to nail art designs. You can find inspiration online, in magazines, or even from your own imagination.
- Practice: The key to mastering DIY nail art is practice. Don’t be afraid to experiment with different techniques and designs until you find your own style.
- Patience: Nail art can be time-consuming, so it is important to be patient. Don’t get discouraged if your first few attempts don’t turn out perfectly.
- Fun: DIY nail art should be fun! Don’t take it too seriously and enjoy the process of creating your own unique designs.
- Inspiration: There are many sources of inspiration for DIY nail art, such as online tutorials, magazines, and social media. Don’t be afraid to experiment with different ideas and create your own unique designs.
These are just a few of the key aspects to consider when getting started with DIY nail art. With a little practice, you can create beautiful and unique nail designs at home. So what are you waiting for? Get started today!
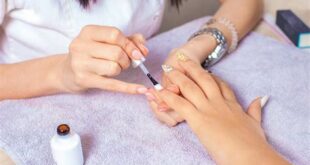
Tools

The right tools are essential for creating beautiful and unique nail art designs. Here are a few of the most important tools for beginners:
- Nail polish: This is the most important tool for nail art, of course! You will need a variety of colors to create different designs.
- Nail art brushes: These brushes are specially designed for nail art, and they come in a variety of shapes and sizes. You will need different brushes for different techniques, such as striping brushes, detail brushes, and dotting tools.
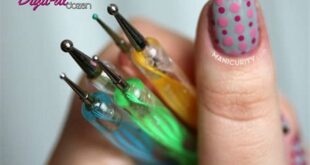
- Dotting tools: These tools are used to create small dots and circles on your nails. They come in a variety of sizes, so you can create dots of different sizes.
In addition to these essential tools, there are a number of other tools that you can use to create more complex nail art designs, such as stamping plates, water marbling tools, and UV lamps. However, these tools are not necessary for beginners.
With the right tools and a little practice, you can create beautiful and unique nail art designs at home. So what are you waiting for? Get started today!
Supplies

In addition to the essential tools listed above, you will also need a few supplies to get started with DIY nail art. These supplies include:
- Nail polish remover: This is essential for removing mistakes and cleaning up your nails before and after painting.
- Cotton balls: Cotton balls are used to apply nail polish remover and to clean up any smudges or spills.
- Toothpicks: Toothpicks can be used to create dots, lines, and other small details on your nails.
These supplies are all relatively inexpensive and easy to find at your local drugstore or beauty supply store.
Having the right supplies is essential for creating beautiful and unique nail art designs. Without the proper supplies, it will be difficult to achieve the desired results.
Here are a few tips for using supplies when doing DIY nail art:
- Use a lint-free cotton ball to apply nail polish remover.
- Be careful not to use too much nail polish remover, as this can damage your nails.
- Use a toothpick to create small details, such as dots and lines.
- Be patient and take your time when doing nail art.
With the right supplies and a little practice, you can create beautiful and unique nail art designs at home.
Key Insights:
- Having the right supplies is essential for creating beautiful and unique nail art designs.
- Nail polish remover, cotton balls, and toothpicks are all essential supplies for DIY nail art.
- These supplies are all relatively inexpensive and easy to find.
Techniques

There are many different nail art techniques that you can learn, each with its own unique look and feel. Some of the most popular techniques for beginners include stamping, water marbling, and freehand painting.
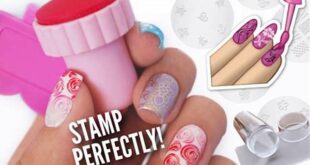
Stamping is a great way to create intricate designs on your nails without having to freehand paint them. To stamp a design, you will need a stamping plate, a stamper, and some stamping polish. Simply apply stamping polish to the design on the stamping plate, then use the stamper to transfer the design to your nail.
Water marbling is another popular nail art technique that can create beautiful, swirling designs. To water marble your nails, you will need a bowl of water, some nail polish, and a toothpick. Simply drip different colors of nail polish into the water, then swirl the colors together with a toothpick. Dip your nail into the water to transfer the design to your nail.
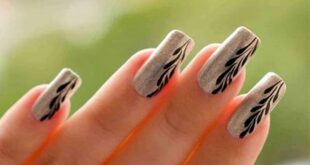
Freehand painting is a more advanced nail art technique that allows you to create your own unique designs. To freehand paint your nails, you will need a nail art brush and some nail polish. Simply use the brush to paint your design directly onto your nail.
These are just a few of the many different nail art techniques that you can learn. With a little practice, you can master these techniques and create beautiful and unique nail art designs at home.
Key Insights:
- There are many different nail art techniques that you can learn, such as stamping, water marbling, and freehand painting.
- Each technique has its own unique look and feel.
- With a little practice, you can master these techniques and create beautiful and unique nail art designs at home.
Designs
The world of nail art is vast and ever-expanding, with endless possibilities for design and creativity. This can be both exciting and daunting for beginners, but it’s important to remember that there are no limits to what you can create. With a little practice and a lot of imagination, you can create beautiful and unique nail art designs that are all your own.
- Inspiration is everywhere: You can find inspiration for nail art designs anywhere you look. From the latest fashion trends to the natural world, there is no shortage of ideas to spark your creativity. Online platforms like Pinterest and Instagram are great places to find inspiration and see what other people are creating.
- Don’t be afraid to experiment: Once you have some inspiration, don’t be afraid to experiment and try new things. There is no right or wrong way to do nail art, so have fun and see what you can create. The more you experiment, the more you will learn and the better you will become at creating beautiful nail art designs.
- Practice makes perfect: As with any skill, practice makes perfect. The more you practice nail art, the better you will become. Don’t be discouraged if your first few attempts don’t turn out perfectly. Just keep practicing and you will eventually master the art of nail design.
- Don’t compare yourself to others: It is easy to get discouraged when you see other people creating beautiful nail art designs, but it is important to remember that everyone starts somewhere. Don’t compare yourself to others, just focus on your own progress and enjoy the journey.
Nail art is a great way to express your creativity and style. With a little practice and a lot of imagination, you can create beautiful and unique nail art designs that are all your own. So what are you waiting for? Get started today and see what you can create!
Practice

For beginners, practice is essential for mastering DIY nail art. Without practice, it is difficult to develop the skills and techniques necessary to create beautiful and unique nail designs. Experimentation is also key, as it allows you to discover new techniques and find your own personal style.
One of the best ways to practice DIY nail art is to start with simple designs. Once you have mastered the basics, you can gradually move on to more complex designs.
Here are a few tips for practicing DIY nail art:
- Start with simple designs.
- Experiment with different techniques.
- Don’t be afraid to make mistakes.
- Practice regularly.
With practice and patience, you will be able to master DIY nail art and create beautiful and unique nail designs.
Key Insights:
- Practice is essential for mastering DIY nail art.
- Experimentation is key to finding your own personal style.
- With practice and patience, you can create beautiful and unique nail designs.
Patience

In the realm of do-it-yourself nail art, patience emerges as a virtue of paramount importance. Embarking on this creative journey often involves a learning curve, and it’s essential to approach it with a mindset of perseverance and understanding.
-
Facet 1: Recognizing the Gradual Nature of Progress
Nail art, like many skills, unfolds gradually over time. It’s unrealistic to expect immediate perfection, especially as a beginner. Patience allows you to appreciate the incremental progress you make with each attempt, celebrating small victories along the way. -
Facet 2: Embracing Imperfection as a Stepping Stone
Embracing the beauty of imperfections is crucial in fostering a growth mindset. Your first attempts may not always meet your expectations, but each “failed” design holds valuable lessons. Patience enables you to learn from mistakes, refine your techniques, and ultimately elevate your nail art skills. -
Facet 3: Dedicating Time to Practice and Refinement
Nail art, like any art form, requires consistent dedication and practice to achieve proficiency. Patience allows you to invest the necessary time to experiment with different designs, explore color combinations, and develop your own unique style. Remember, patience is not about waiting passively but about actively engaging in the process of learning and improvement. -
Facet 4: Cultivating Emotional Resilience
Patience in nail art is not merely about waiting but also about cultivating emotional resilience. It allows you to remain composed when faced with setbacks, to not give up easily, and to approach each new challenge with a positive and determined attitude.
In conclusion, patience is an indispensable virtue in the journey of do-it-yourself nail art. It fosters a growth mindset, allows for gradual progress, and helps you embrace the learning process. By cultivating patience, you empower yourself to create beautiful and unique nail designs, one step at a time.
Fun

In the realm of do-it-yourself (DIY) nail art, the element of fun holds immense significance for beginners. Embracing the enjoyable nature of this creative pursuit can positively impact the learning process and contribute to a more fulfilling experience.
Firstly, recognizing nail art as a fun and recreational activity can alleviate the pressure and anxiety often associated with learning a new skill. This mindset allows beginners to approach the process with a sense of playfulness and experimentation, fostering a greater willingness to try new designs and techniques without the fear of making mistakes.
Moreover, the enjoyable aspect of DIY nail art can serve as a motivating factor, encouraging beginners to dedicate time and effort to practice and improve their skills. When nail art is perceived as a pleasurable activity, it becomes an enjoyable hobby rather than a chore, leading to a more consistent and dedicated approach to learning.
Furthermore, embracing the fun element can contribute to a more positive and optimistic outlook towards the learning process. Beginners who approach nail art with a sense of enjoyment are more likely to view setbacks and challenges as opportunities for growth and learning. This positive attitude can significantly enhance the overall experience and make the journey towards mastering DIY nail art more rewarding.
In summary, recognizing and embracing the fun aspect of DIY nail art is essential for beginners. It creates a positive and enjoyable learning environment, fosters a willingness to experiment and improve, and contributes to a more fulfilling and rewarding experience overall.
Practical Significance:
- Encourages a relaxed and playful approach to learning.
- Motivates beginners to practice and improve their skills.
- Creates a positive and optimistic learning environment.
- Makes the overall experience of learning DIY nail art more enjoyable and rewarding.
Inspiration

For beginners venturing into the world of do-it-yourself (DIY) nail art, seeking inspiration is crucial. It fuels creativity, sparks new ideas, and provides a foundation for developing unique designs.
-
Facet 1: Harnessing the Power of Online Resources
The internet offers a vast treasure trove of inspiration for DIY nail art beginners. Online tutorials, blogs, and social media platforms showcase a diverse range of designs, techniques, and color combinations. By exploring these resources, beginners can gain valuable insights into the latest trends, learn from experienced nail artists, and discover new ideas that resonate with their personal style. -
Facet 2: Drawing Inspiration from Print Media
Traditional print media, such as magazines and nail art books, remain valuable sources of inspiration for beginners. These publications often feature curated collections of designs, showcasing the work of professional nail artists and providing detailed instructions and tips. By studying these sources, beginners can expand their knowledge of different nail art techniques and find inspiration for their own creations. -
Facet 3: Exploring the Creative Community on Social Media
Social media platforms like Pinterest, Instagram, and TikTok have emerged as vibrant communities for nail art enthusiasts. Beginners can follow nail artists, join groups, and engage in discussions to stay updated on the latest trends, discover new techniques, and connect with others who share their passion for nail art. This social interaction can foster a sense of belonging and provide a platform for sharing ideas and seeking feedback. -
Facet 4: Embracing Original Ideas and Experimentation
While external sources of inspiration are valuable, it is equally important for beginners to develop their own unique style and experiment with original ideas. By experimenting with different color combinations, techniques, and embellishments, beginners can create designs that reflect their individuality and creativity. Encouraging experimentation and originality helps foster a sense of ownership and satisfaction in the creative process.
In conclusion, for beginners embarking on the journey of DIY nail art, seeking inspiration from various sources is essential. By harnessing the power of online resources, drawing inspiration from print media, exploring the creative community on social media, and embracing original ideas, beginners can nurture their creativity, expand their knowledge, and develop their own unique style in the world of nail art.
FAQs on DIY Nail Art for Beginners
Embarking on the journey of do-it-yourself (DIY) nail art as a beginner often raises several common questions and concerns. This FAQ section aims to provide clear and concise answers to these frequently asked questions, addressing misconceptions and offering valuable guidance for aspiring nail artists.
Question 1: Is DIY nail art suitable for beginners with no prior experience?
Answer: Absolutely! DIY nail art is an accessible and beginner-friendly activity. With patience and practice, anyone can master the basics and create beautiful nail designs at home.
Question 2: What essential tools and materials do I need to get started?
Answer: To begin your DIY nail art journey, you will need basic tools such as nail clippers, a nail file, a cuticle pusher, and a dotting tool. Essential materials include nail polish, a top coat, and a base coat.
Question 3: How can I ensure my nail art designs last longer?
Answer: To enhance the longevity of your nail art, it is crucial to prepare your nails properly by removing any oils or debris. Use a base coat before applying your nail polish and seal your design with a top coat. Additionally, avoid exposing your nails to excessive moisture or harsh chemicals.
Question 4: What are some common mistakes to avoid as a beginner?
Answer: Common pitfalls for beginners include applying thick layers of nail polish, not allowing each coat to dry completely, and using low-quality products. To prevent these mistakes, apply thin coats, allow ample drying time, and invest in reputable nail polish brands.
Question 5: Where can I find inspiration for unique nail art designs?
Answer: Inspiration for DIY nail art is abundant online. Explore social media platforms like Pinterest and Instagram, browse nail art blogs, and refer to magazines for a wide range of design ideas and techniques.
Question 6: How do I improve my skills and techniques over time?
Answer: Consistent practice is key to refining your DIY nail art skills. Experiment with different designs, try new techniques, and seek feedback from others to identify areas for improvement. Additionally, attending workshops or online courses can provide valuable guidance and accelerate your learning.
In conclusion, DIY nail art offers a fun and accessible way for beginners to explore their creativity and achieve beautiful nail designs at home. Embracing patience, utilizing the right tools and materials, and seeking inspiration are essential for a successful journey into the world of DIY nail art.
Transition to the next article section:
For further guidance and in-depth exploration of DIY nail art techniques, continue reading our comprehensive guide.
Essential Tips for DIY Nail Art Beginners
Embarking on the journey of do-it-yourself (DIY) nail art as a beginner requires careful attention to techniques and practices that ensure successful and satisfying results. Here are some essential tips to guide you on your creative path:
Tip 1: Preparation is Paramount
Before applying any nail polish, it is crucial to prepare your nails properly. This involves removing any existing polish, gently pushing back cuticles, and filing your nails to your desired shape. Clean nails free of oils and debris will allow for better adhesion of the polish, resulting in a longer-lasting manicure.
Tip 2: Base and Top Coats are Essential
Applying a base coat before your nail polish provides a smooth surface for the color to adhere to, preventing staining and extending the life of your manicure. Similarly, a top coat seals in the color, adds shine, and protects your design from chips and scratches.
Tip 3: Thin Coats and Patience
Resist the urge to apply thick layers of nail polish in an attempt to achieve full coverage quickly. Instead, apply thin, even coats and allow each coat to dry completely before applying the next. This technique prevents smudging, bubbling, and peeling, resulting in a smooth and professional-looking finish.
Tip 4: Practice Makes Perfect
As with any skill, practice is essential for improvement in DIY nail art. Start with simple designs and gradually progress to more complex ones as you gain confidence. Experiment with different colors, patterns, and techniques to discover your unique style and enhance your skills.
Tip 5: Clean Up Mistakes
Mistakes are inevitable during the nail art learning process. To correct any smudges or imperfections, use a small brush dipped in nail polish remover to carefully clean up the edges. For larger mistakes, remove the entire nail polish and start over with a fresh base coat.
Tip 6: Protect Your Design
Once you have created your desired nail art design, protect it from wear and tear. Avoid exposing your nails to excessive water or harsh chemicals. Wear gloves while cleaning or handling strong detergents to prevent damage to your manicure.
Summary of Key Takeaways:
- Proper nail preparation ensures better polish adhesion and longevity.
- Base and top coats protect your nails and extend the life of your manicure.
- Applying thin coats of nail polish and allowing them to dry thoroughly prevents smudging and peeling.
- Practice regularly to improve your skills and techniques.
- Mistakes can be easily corrected with a small brush and nail polish remover.
- Protecting your nail art design from wear and tear will ensure its longevity.
Conclusion:
With dedication, patience, and the right techniques, you can master the art of DIY nail art and create beautiful, salon-quality designs at home. Remember, practice is key, and don’t be afraid to experiment and find your own unique style. Embrace the creative process and enjoy the satisfaction of achieving stunning nail art.
Conclusion
The journey of DIY nail art for beginners is a fulfilling and empowering endeavor. With the right tools, techniques, and a touch of patience, anyone can create stunning nail designs at home. This comprehensive guide has explored the fundamentals of DIY nail art, providing aspiring nail artists with the knowledge and confidence to embark on their creative journey.
Remember, practice is the key to mastering any skill. Embrace the learning process, experiment with different designs, and refine your techniques over time. The world of nail art offers endless possibilities for self-expression and creativity. As you delve deeper into this art form, you will discover your unique style and find joy in creating beautiful and eye-catching nail designs.